If you’re a makeup guru chances are you have a fully stocked set of makeup brushes at your disposal. You have a foundation brush, blush brush, one used for contour, another for concealer – the list goes on and on.
One day, as you’re storing away your brushes, you come across a new brush that was gifted to you a few weeks back. You’re stumped. You have no idea what it’s used for. Enter, the stippling brush; a multi-purpose brush that offers a smooth and flawless makeup finish.
What is a stippling brush used for in makeup? Should you add one to your collection? I’ll go over this and more, so read on, beautiful!

What is a Stippling Brush?
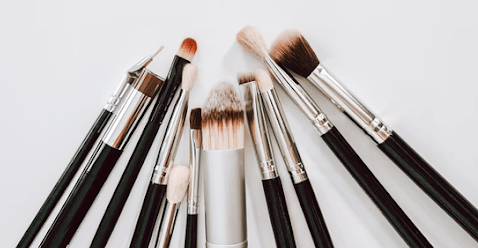
Stippling brushes are used for makeup applications. Typically, they will feature two sets of bristles – the top consisting of white synthetic fibers and the bottom consisting of denser, black fibers. The white fibers are used to pick up the product, while the black bristles help push the product onto your skin (as opposed to absorbing it).
What is Stippling?
Stippling refers to the action of applying liquid or cream foundation in the form of small dots. Dotting your skin means you’re applying makeup in small dots so close together they create a nicely blended, flawless finish. Think about real-life airbrushing! You’ll receive full coverage and an easy way to cover up blemishes. It can also be used to apply blush, highlighters, bronzer, and powder.
How to Use a Stippling Brush
Wondering how to use a stipple brush? It’s super easy – just follow these three steps:
1. Choose the Right Brush
Stippling brushes come in all sizes. If you plan to use one for foundation, go with a bigger option. Smaller brushes are best when working with contour, blush, or highlighter. You can find stipple brushes online or at any store that sells makeup and beauty products.
How much do they cost? You can get a quality stipple brush anywhere from $8-20. The price varies depending on size, material, and brand.
2. Apply the Product
Apply a small amount of foundation to the top of your brush. If you’re using contour or highlighter, gently pat down on the product and apply to the areas you want to chisel, like the cheeks or forehead. Be sure to use a small stipple brush for highlighter, blush, or contour. A large one will spread out the product giving you less control.
3. Blend Away
Dab the product onto your skin until blended. You may need to build up your foundation to get an even level of coverage around your entire face. Once you’ve blended completely, get on with the rest of your makeup routine. Apply some mascara, lipstick, and setting spray.
Caring for Your Brush
The best way to care for your stipple brush is to keep it clean. Not only will this prevent makeup from building up, but it will also protect your skin. Dirty brushes can irritate your skin and lead to infections or breakouts.
You can easily spot clean your stippling brush using a hand towel and some brush cleanser after each use. This will get most of the makeup off, so it’s not packed with foundation when you use it again. Some people even like using baby shampoo for a gentle cleanse. Also, be sure to sanitize your makeup brushes weekly or bi-weekly, depending on how often you use them. While you’re at it, I recommend you sanitize the rest of your makeup too!
Making the Most of Your New Brush
A stipple brush is seriously a game-changer. They’re great for those that want a flawless makeup finish for something as casual as brunch or a more special event like a date night. They also offer a simple way to cover up imperfections or blemishes like acne scarring as they provide a smooth finish.
But don’t take my word for it – try using a stippling brush yourself! I hope you’re as stoked as I was when I used one for the first time. It’s easy to use and blends your foundation oh so effortlessly!
And, the next time you see the friend that gifted this brush to you, be sure to thank them for introducing you to such an awesome brush.


